
Concepts
SweejTech HDR is based upon two interrelated systems, culling -- preventing sounds playing that are below a given loudness threshold, and attenuating -- scaling the gain of quieter sounds based on their predefined loudness and metered signal. HDR prioritizes more important, or generally 'louder' sounds and scales the output signal to the 'loudest' perceived sound while preserving the relationships between adjacent sounds.
Understanding HDR Units
HDR uses values that represent dB SPL (Sound Pressure Level) rather than dBFS (Full Scale). This means HDR loudness values work on a positive scale (0 to 220) similar to real-world sound pressure measurements, rather than the negative scale (-96 to 0) used for digital audio signals.
In practice, these values allow dB math operations that wouldn't fit within dBFS constraints. The system converts these values back to dBFS for actual playback. This approach lets you work with loudness conceptually as you would in the real world, while the plugin handles the technical conversion behind the scenes. If you're used to working with Audio Inspector or other tools that display dBFS values, just remember: HDR loudness is a separate measurement system focused on perceived loudness rather than signal amplitude.
For more details, see the FAQ section on dB units.
Resting Loudness
The Resting Loudness is the value that sounds within the HDR system are mixed against. 80 is the default Resting Loudness value for the system and is set in Project Settings / SweejTech / HDR.
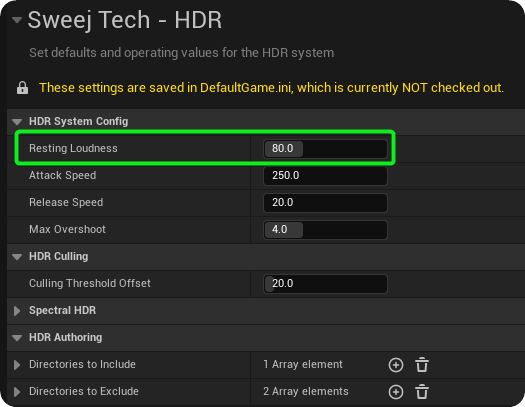
The resting level of 80 isn't arbitrary - it corresponds to where the stapedius reflex naturally occurs in human hearing (around 80 dB SPL at 1 meter). This is an involuntary contraction of the stapedius muscle which attempts to protect the inner ear from damage. When sounds are at this level playback will be the same as without HDR, which is often a good starting point. Think of it as your natural "home base" for sound levels.
Defined Loudness, Loudness Offsets & Distanced Loudness
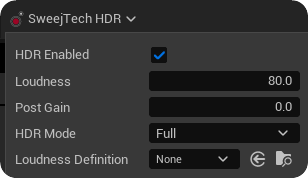
Each sound that you want within the HDR system is assigned a Defined Loudness value, either in the sound asset itself (Sound Wave, Sound Cue or MetaSound) via SweejTech HDR toolbar or via the 'HDR Authoring' window.
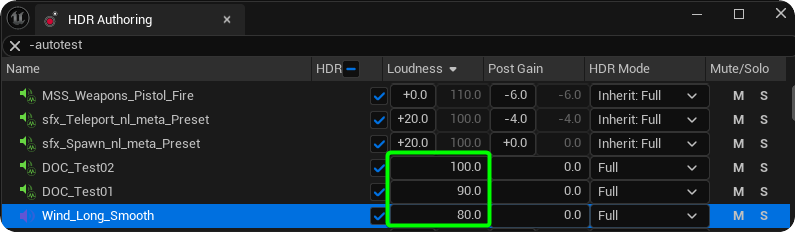
In the HDR Authoring screenshot above the three lower sounds have a defined loudness of 100, 90, and 80 respectively. The other three sounds belong have been grouped using Loudness Definitions. They inherit their default loudness from their Loudness Definition (110 and 100), but then two of the sounds have a Loudness Offset of +20. This enables you to group sounds logically but still retain individual control. (Loudness Modifiers can also be set dynamically within code, via Blueprints or within MetaSounds.)
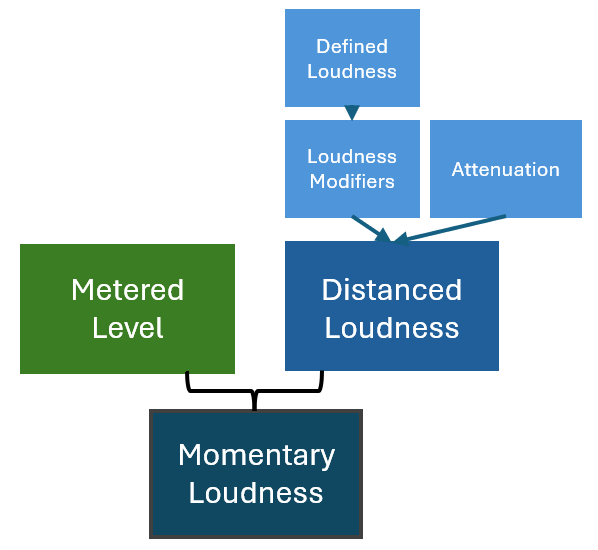
The Defined Loudness, and any Loudness Modifiers are set by the user based on the desired loudness for the sound and the priority they want to give the sound within the HDR System. The Defined Loudness of a sound, together with any Loudness Modifiers, is combined with the sound's Attenuation settings to produce a Distanced Loudness value. This overrides Unreal Engine's volume attenuation control and is applied to the Metered Level to produce a Momentary Loudness value for that sound.
Momentary Loudness, Resting Loudness & System Loudness
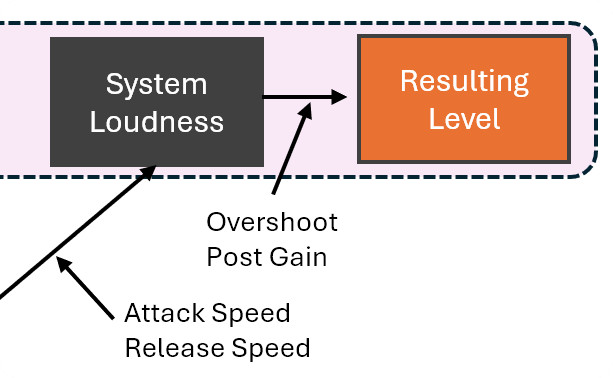
As just described, the Momentary Loudness of a sound is the product of its Metered Level and its Distanced Loudness. Under normal circumstances this allows the HDR system to behave in the same way as the normal Unreal Engine audio system in relation to volume and attenuation. However, this Momentary Loudness is then used to affect the System Loudness, and in turn this creates the ducking effect.
The system evaluates the Momentary Loudness of all HDR sounds to identify and set the Max Momentary Loudness, the highest current Momentary Loudness value. Any Max Momentary Loudness values that are above the Resting Loudness are used to then determine the System Loudness. How rapidly the System Loudness responds to these values is determined by the Attack Speed and Release Speed Settings.
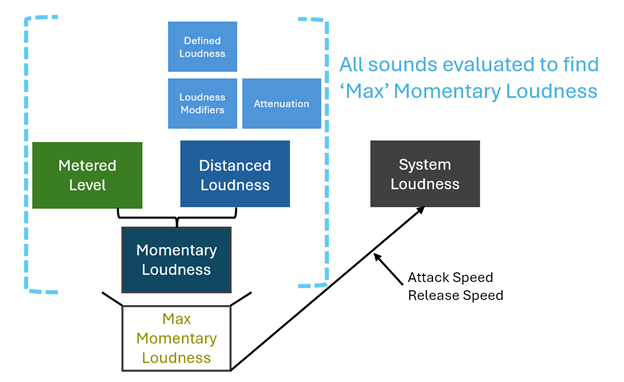
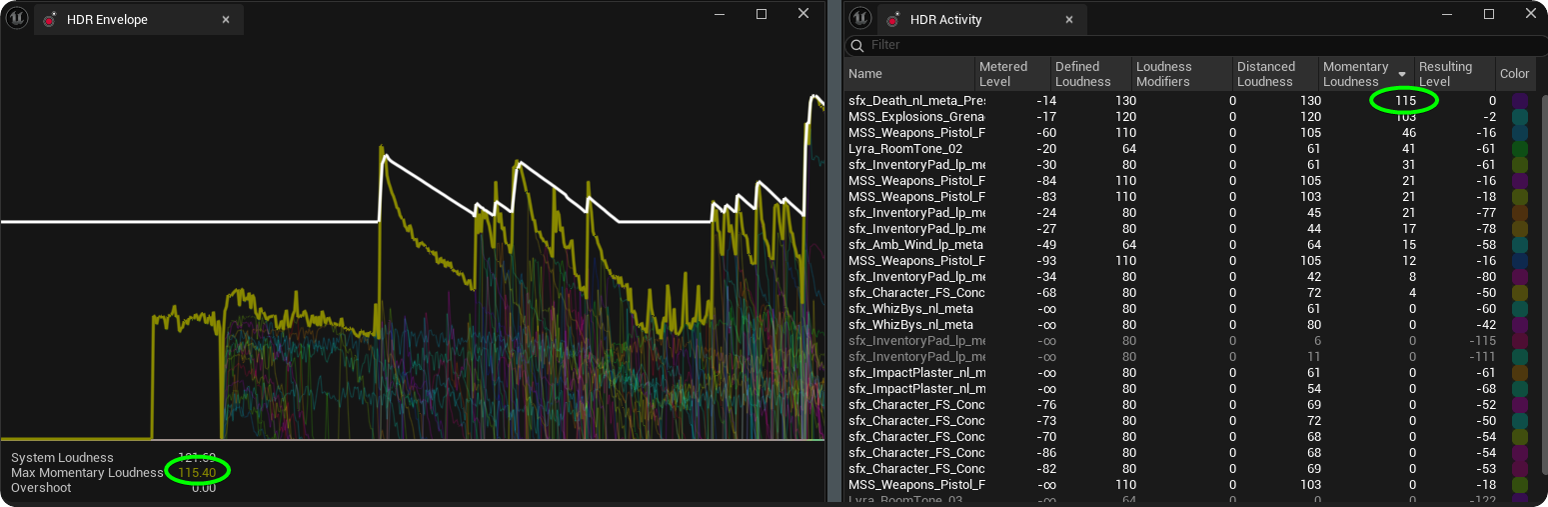
Just to emphasize, the Max Momentary Loudness is not a sum of all loudness's; it follows highest current Momentary Loudness value ('Max') across all playing sounds. In the example from the HDR Envelope window below you can observe how the Max Momentary Loudness (the yellow line) governs the System Loudness (the white line), and how the way it follows is regulated by the Attack and Release Speed settings.
System Loudness and ducking effects
From the explanation above you can hopefully see that sounds with a Defined Loudness that is greater than the Resting Loudness (default 80) have a good chance of pushing up the System Loudness (depending on any Loudness Offsets and Attenuation). Once the System Loudness goes above the Resting Loudness all HDR sounds are attenuated based on the difference between their Distanced Loudness and the System Loudness.
Distanced Loudness -- System Loudness = Resulting Level
Therefore, as the System Loudness increases above the Resting Loudness any sounds with a Defined Loudness of less than the Resting Loudness will be ducked (after Attenuation and any Loudness Modifiers are accounted for). Having the Defined Loudness as a factor in the calculation means that the relative relationships between the sound's loudness is maintained.
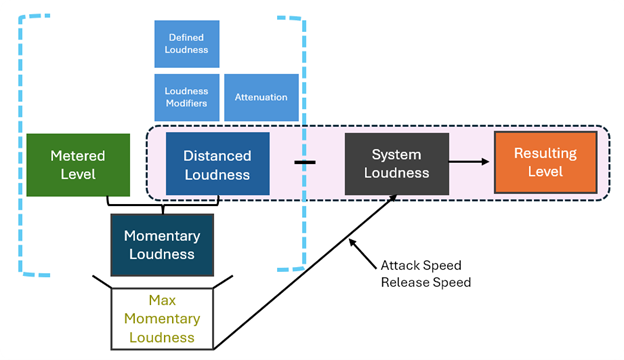
(Note this is not the complete system but illustrates the discussion thus far)
When System Loudness and Resting Loudness are equal
In this example no ducking is being applied, since the System Loudness has not been pushed up above the Resting Loudness. In this case the HDR system simply replicates the normal volume and attenuation functions within Unreal Engine.
Let's look at an example without attenuation first. Under normal conditions the System Loudness is the same as the Resting Loudness, 80 by default. Without worrying about any Loudness Offsets or attenuation the system sets the loudness of the sounds according to their Defined Loudness.
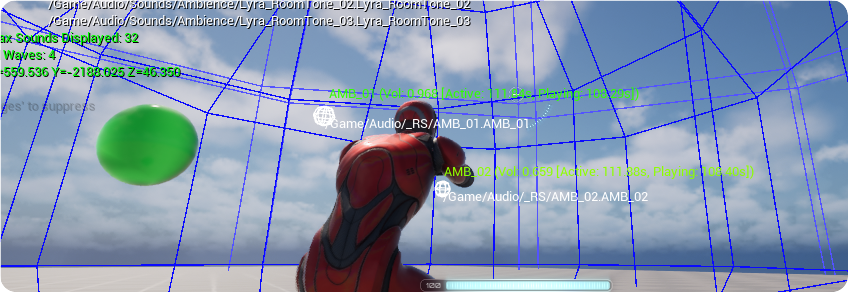
AMB_01 has a Defined Loudness of 60, 20 under the Resting Loudness so: 60 (Distanced Loudness with no attenuation) -- 80 (System Loudness) = Resulting Level -20
AMB_02 has a Defined Loudness of 70, 10 under the Resting Loudness so: 70 (Distanced Loudness with no attenuation) -- 80 (System Loudness) = Resulting Level -10

When we are external to the inner radius of a sound and attenuation is applied this then also factors into the calculation. This time the Distanced Loudness is not the same as the Defined Loudness since the sound's attenuation is also a factor.
AMB_01 has a defined loudness of 60, 20 under the Resting Loudness so:
50 (Distanced Loudness including attenuation) -- 80 (System Loudness) = Resulting level -30
AMB_02 has a defined loudness of 70, 10 under the Resting Loudness so:
60 (Distanced Loudness including attenuation) -- 80 (System Loudness) = Resulting level -10

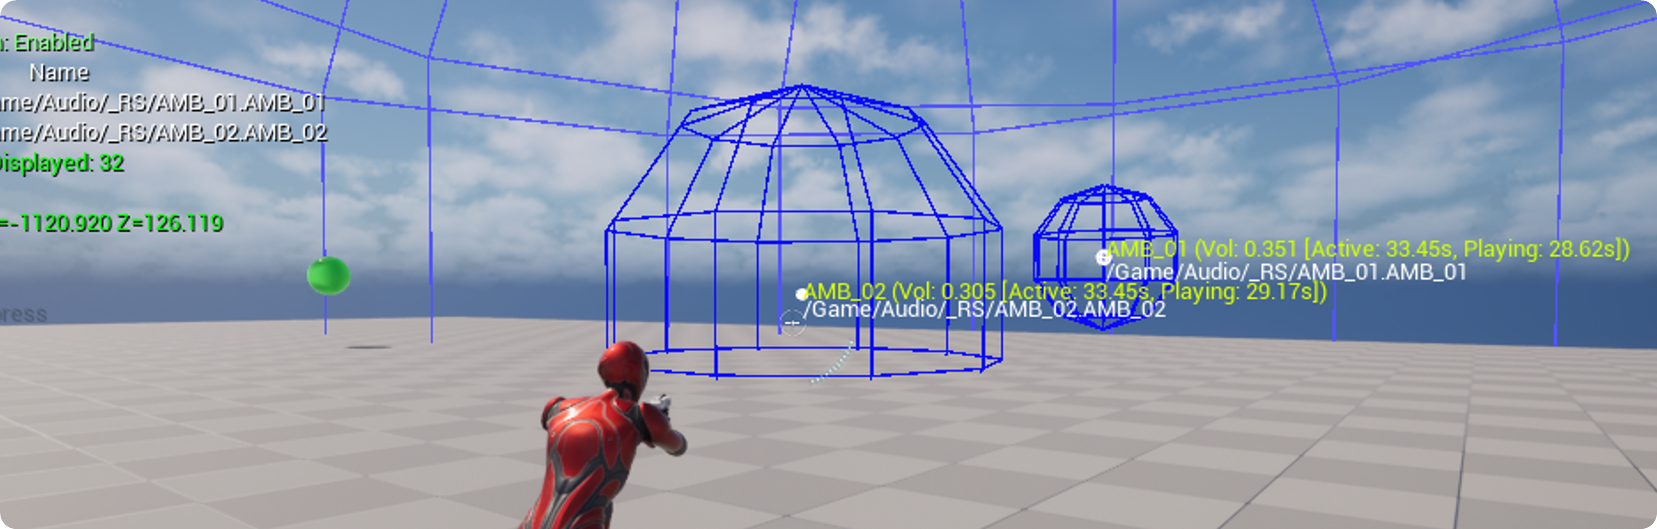
This is useful to see what is going on, but simply represents how the HDR system recreates the normal volume and attenuation functions in the engine.
When System Loudness is pushed above Resting Loudness
Now let's look at an example where HDR Ducking comes into play. Below you can see the HDR Envelope window as a pistol is fired.
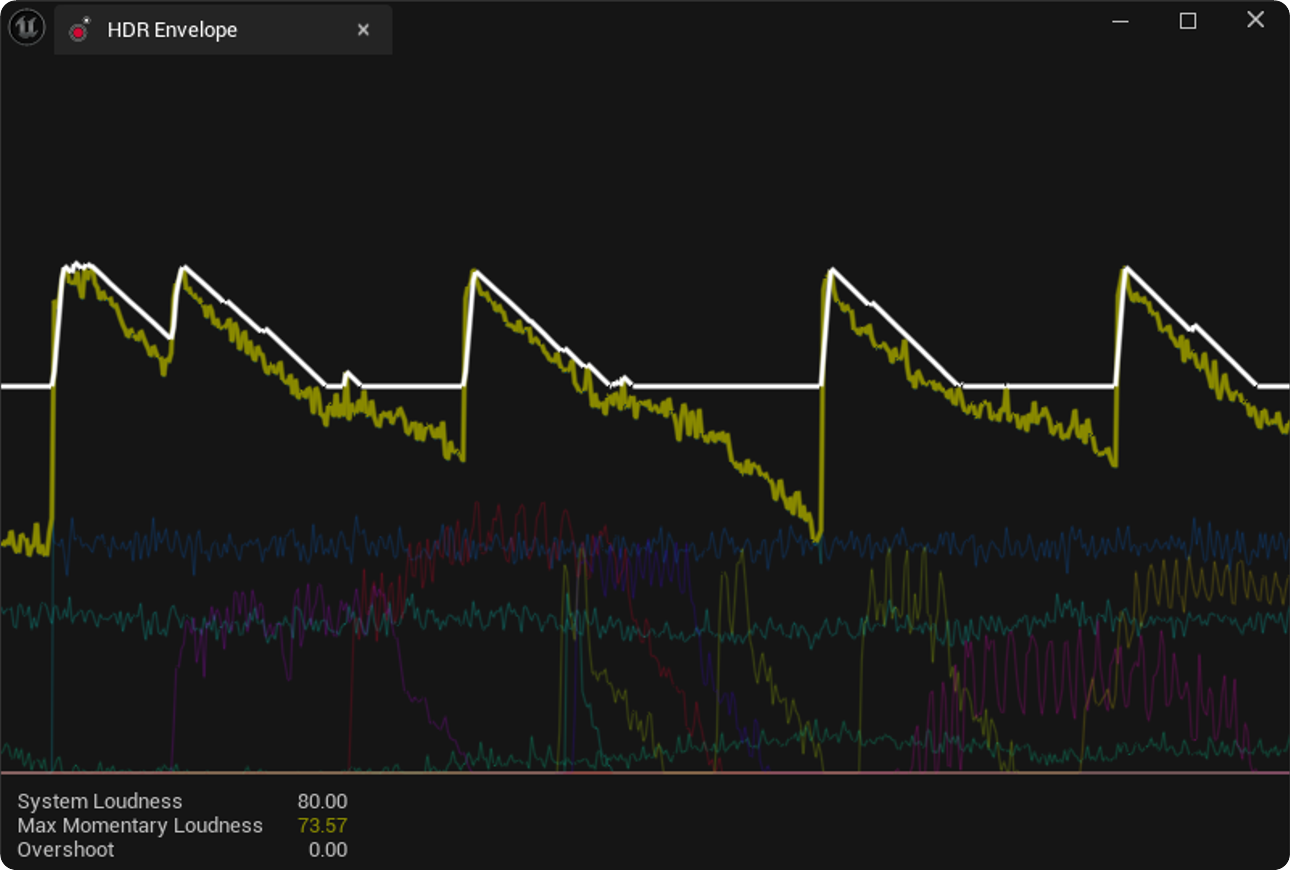
The Pistol has a Defined Loudness of 110, so when it is fired the Momentary Loudness of this (Distanced Loudness -- Metered Level) has the highest value of all playing sounds, therefore it is taken to set the Max Momentary Loudness value.
Metered Level -3*, Distanced Loudness* 110, Momentary Loudness 107.
Since this is the highest Momentary Loudness this value is taken as the Max Momentary Loudness (107), so System Loudness is set to 107.
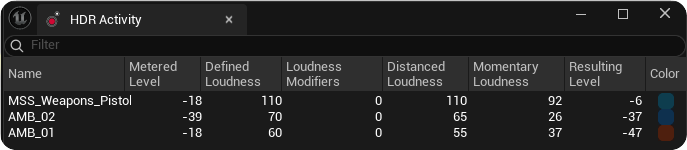
This System Loudness value then affects the level of other HDR enabled sounds:
AMB_01: Distanced Loudness 57 -- System Loudness 107 = Resulting Level -50
AMB_02: Distanced Loudness 67 -- System Loudness 106 = Resulting Level -40
(* Values that represent precisely what is happening can be hard to capture in the HDR Activity window due to rapidly changing values and the effects of the Attack Speed and Release Speed settings)
So the two ambience sounds have ducked because a sound that is louder than the Resting Loudness has played, and therefore pushed up the System Loudness. This has an inverse effect on the Resulting Level of these sounds. But because their Defined Loudness is used to calculate their Distanced Loudness the relative loudness between these two sounds (10) is preserved, although rarely will you see it so explicitly since it will of course be affected by the listeners distance from each sound as well.
When you want certain sounds to duck other sounds you start a balancing act between loudness, attenuation, and audio signal. For these sounds, working within a range of 80-100 is very reasonable. While the system can handle values up to 150 or above, these extreme levels are best reserved for special dramatic effects. What's interesting is that even small changes can be very effective - just 6dB of headroom above resting can create impactful ducking behavior.
Overshoot and Max Overshoot
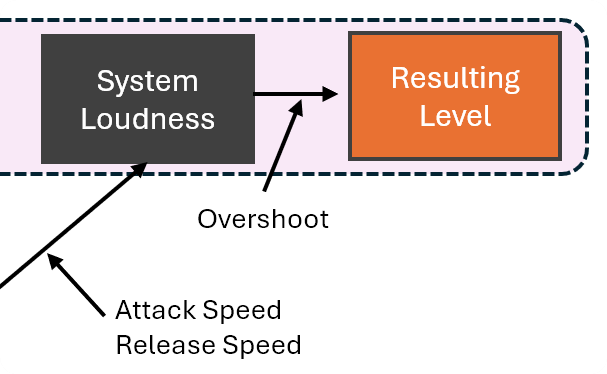
While a sound's Momentary Loudness is higher than the current System Loudness, a gain equal to that overshoot is applied, up to Max Overshoot. This is the maximum gain in dB that can be applied to any sound's output send and determines how much louder than unity gain the system is allowed to get. For example, with the default Max Overshoot of 4dB the Resulting Level of any sound in the system will never be more than 4dB. This allows important sounds, such as the initial shot of a weapon to punch through without being attenuated by the Attack Speed of the system.
Post gain
This is a decibel value ranging from -∞ to +6dB. It allows you to apply an additional gain after the HDR mixing phase has taken place, regardless of the results of those calculations. This is for the unusual but possible case that sounds need some make-up gain or come through a little hot after HDR mixing. Since it's a constant push and pull between loudness and metered audio signal, it can be difficult to control the final signal strength. This gain is applied after all HDR calculations.
HDR Modes: Full, Read, Write, Static
HDR sounds can use one of four modes - Full, Read, Write or Static. Full mode is the default setting which should work well for most sounds.
| Mode | Affects System Loudness | Attenuated by System Loudness |
|---|---|---|
| Full | ✅ | ✅ |
| Read | ❌ | ✅ |
| Write | ✅ | ❌ |
| Static | ❌ | ❌ |
Full Mode affects and is affected by System Loudness. The sound affects System Loudness calculations based on its defined loudness, and its volume is adjusted based on the current System Loudness. Overshoot applies when the metered signal pushes the Max Momentary Loudness above the System Loudness.
Write Mode affects other sounds but is not affected by System Loudness itself. The critical behavior here is that the loudness value is ignored for this sound's playback volume - it only plays at its base volume without any HDR boost or reduction. However, the sound still affects System Loudness calculations, influencing other sounds. No overshoot applies, and distance attenuation directly lowers the playback volume rather than affecting loudness calculations. This mode is perfect for sounds that must always be heard, like artillery warnings or critical UI sounds. A common confusion with Write mode is that sounds seem quieter than expected. This happens because the loudness value doesn't boost the playback volume - only the base audio level plays. Adjust your attenuation curves accordingly if needed.
Read Mode is affected by but does not affect System Loudness. The sound volume is adjusted based on System Loudness, but it doesn't contribute to System Loudness calculations. Overshoot applies normally.
This is intended for sounds that should duck when important sounds play, but shouldn't duck other sounds themselves.
Static Mode When enabled, sounds won't affect nor be affected by the dynamics of the HDR system - essentially providing a way to opt out of HDR processing without disabling the entire system. Then why use static mode instead of simply disabling HDR? The answer lies in workflow consistency. Static mode allows you to use the plugin as a normal mixing environment, maintain the same mixing workflows and stay within the decibel domain while selectively controlling which sounds participate in dynamic processing.
Static mode proves particularly valuable for specific types of content that benefit from consistent, predictable behavior:
Narrative voices and dialogue - Keep critical story moments intelligible and at reliable levels, ensuring they cut through without competing
Music tracks - Preserve the intended mix
Essential gameplay audio - Footsteps, UI feedback, and other navigation-critical sounds maintain their presence even when soundscapes get busy, preventing important audio cues from getting lost in the mix
Culling
Whilst the resulting level system has the effect of ducking quieter sounds there is also the option to actually prevent quieter one-shot sounds from playing at all. This allows you to save on CPU usage and enables a wider dynamic range before clipping occurs.
A Culling Threshold Offset value in the 'HDR Controls' window allows you to define the offset from the Max Momentary Loudness where culling will occur. This creates a Culling Threshold at Max Momentary Loudness -- Culling Threshold offset, shown in red below.
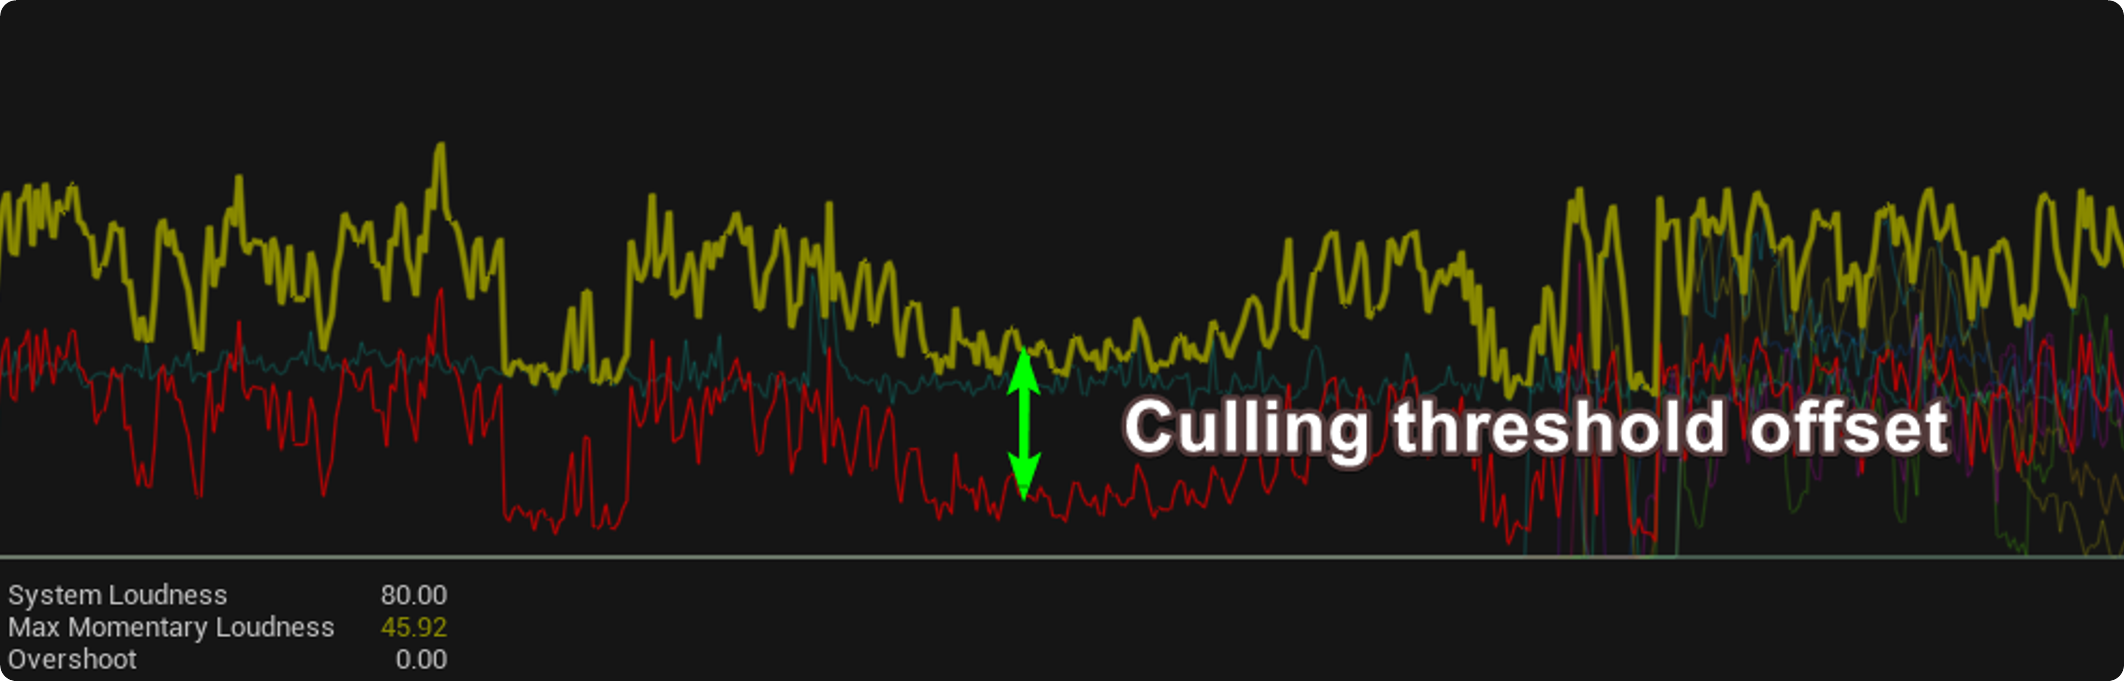
This creates a moving HDR window that is mapped to the dynamic range of the system. When a sound is queued to play, its Distanced Loudness is evaluated and if this falls below the Culling Threshold then the sound is prevented from playing.
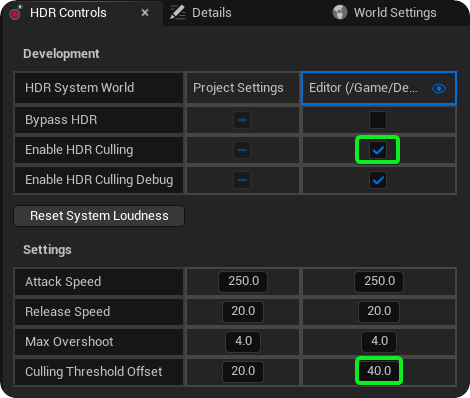
For example, if HDR culling is enabled within the 'HDR Controls' window and the Culling Threshold Offset is set to 40 then at a Max Momentary Loudness of 120 the Culling Threshold will be 80 (120-40).
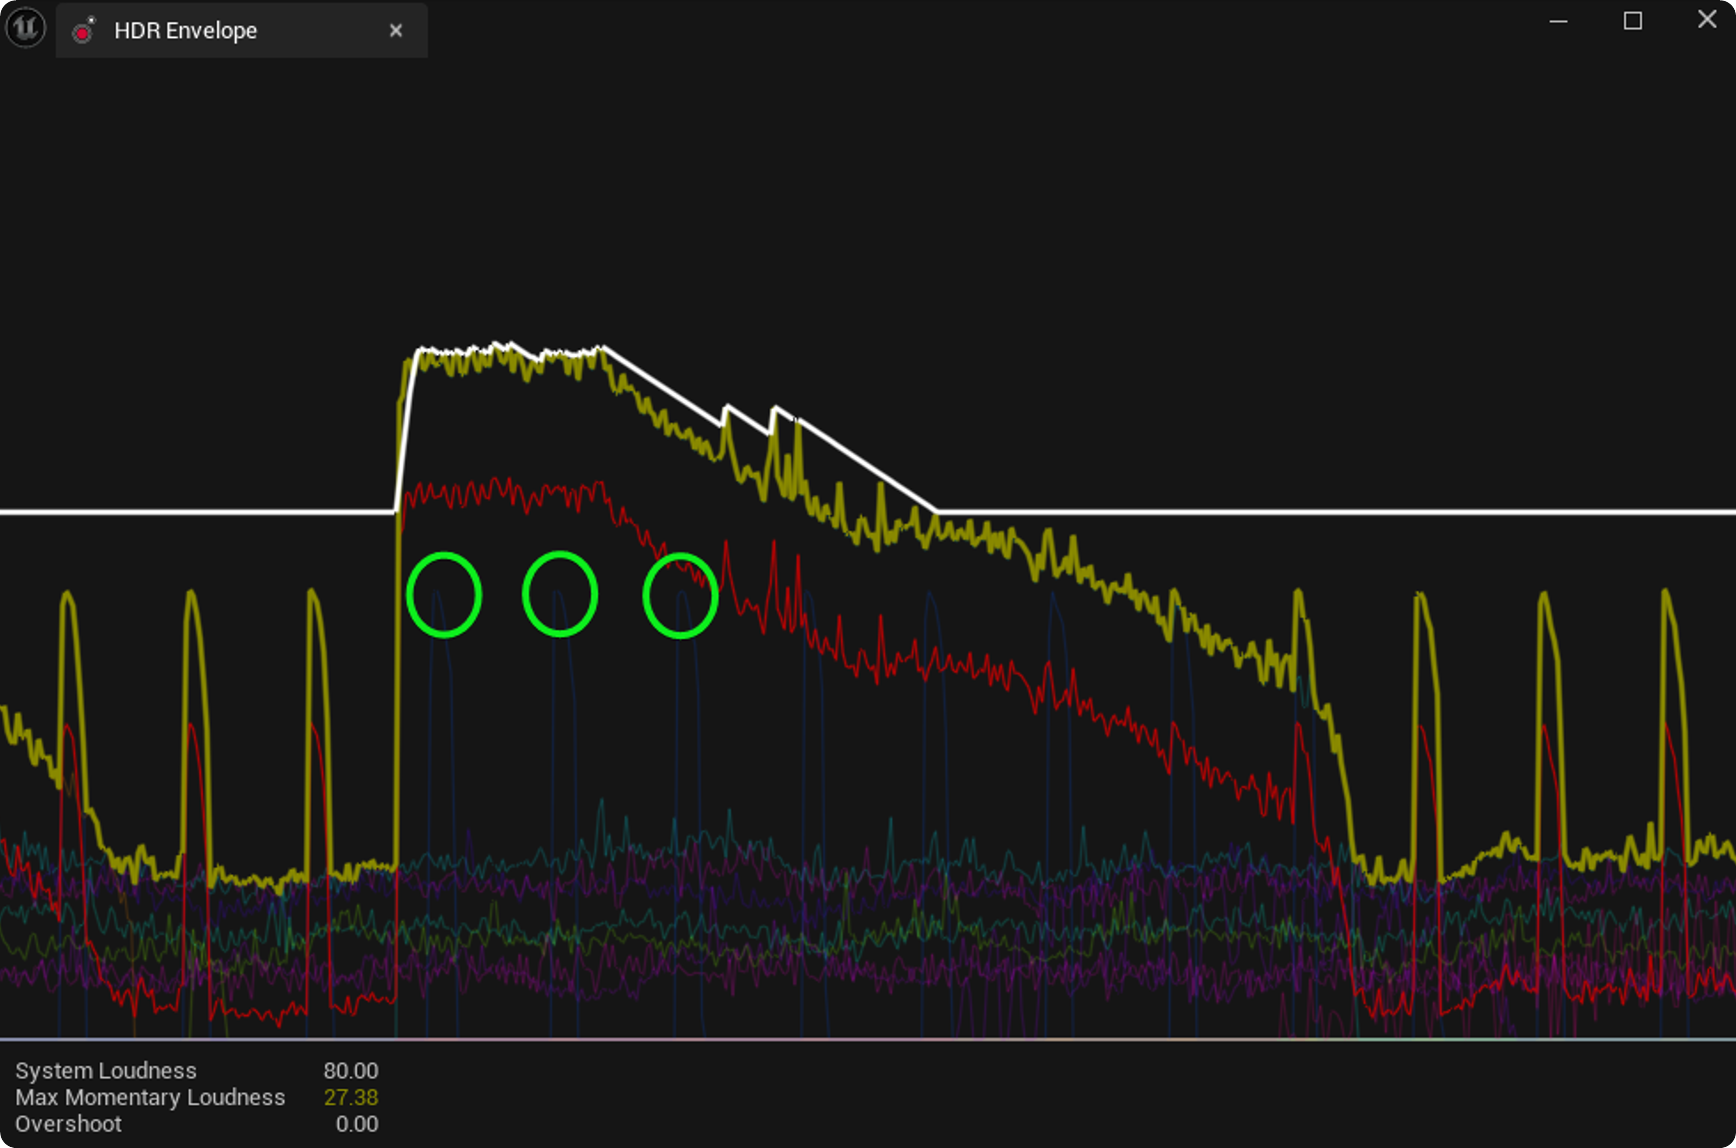
This means that any one-shots with a Distanced Loudness value below 80 are prevented from playing. The 'Envelope window' displays the Momentary Loudness, not the Distanced Loudness - but for illustration purposes you can see that during the loud period in the center the one-shot sounds highlighted in green are prevented from playing by the culling system. (The Distanced Loudness of a sound is used as opposed to the Momentary Loudness, which takes into account the metered level, since these calculations are made prior to the sound playing.)
You can view the Culling Threshold in the 'Envelope window' by enabling HDR Culling Debug in the 'HDR Controls' window. With this enabled a message is also printed to screen when a sound is culled by the HDR system.
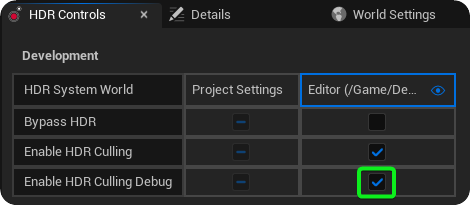
This will enable you to more easily identify the Culling Threshold Offset value that will work best for your particular scenario. For further details and illustrations see the HDR Controls window section below, and for dynamically adjusting the Culling Threshold Offset value at runtime see the Adjusting Dynamically section.